Step 1.
The first step is to connect your laminator to a power source, and then to turn it on. It might take a few minutes for your machine to warm up, depending on which one you have.
Your laminating pouches should be selected according to the instructions for the machine. (Your device’s instruction manual will be able to guide you in this matter.)
Be aware that pouches range in thickness from 1.5 mil to 10 mil. Thicker pouches offer better protection.
Step 2.
The next step is to select the appropriate temperature setting. You will need to choose the setting that is appropriate for the thickness of the pouch.
As the adhesive melts, you will need to set the temperature higher for thicker supplies. The temperature scale on some machines is Celsius or Fahrenheit, while others display settings by pouch thickness.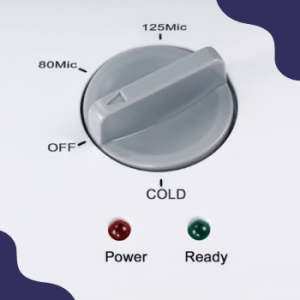
The instruction manual will explain which setting you should use if you have any trouble deciding.
Choosing the appropriate setting and waiting for the machine to reach the correct temperature is the next step.
Step 3.
Insert your document or photo in the laminating pouch. Make sure the item is centered evenly with equal borders around it.
In an effort to prevent the device from being damaged while it is running through the machine, place the pouch in a carrier.
The folded edge of the carrier should go in first. Laminating begins when the machine grabs hold of the carrier.
Step 4.
It will emerge from the back of the laminator. Take a few minutes to let it cool. Avoid handling the document for too long.
If you do, the final product will be damaged. Take it out of the carrier after it has cooled off. You can reuse the carrier dozens of times if you save it for future use.
Step 5.
Just repeat steps one through four if you need to laminate anything else.
After you’re done, allow the laminator to cool before shutting it down (even though you won’t need to turn it on again unless you already shut it off).